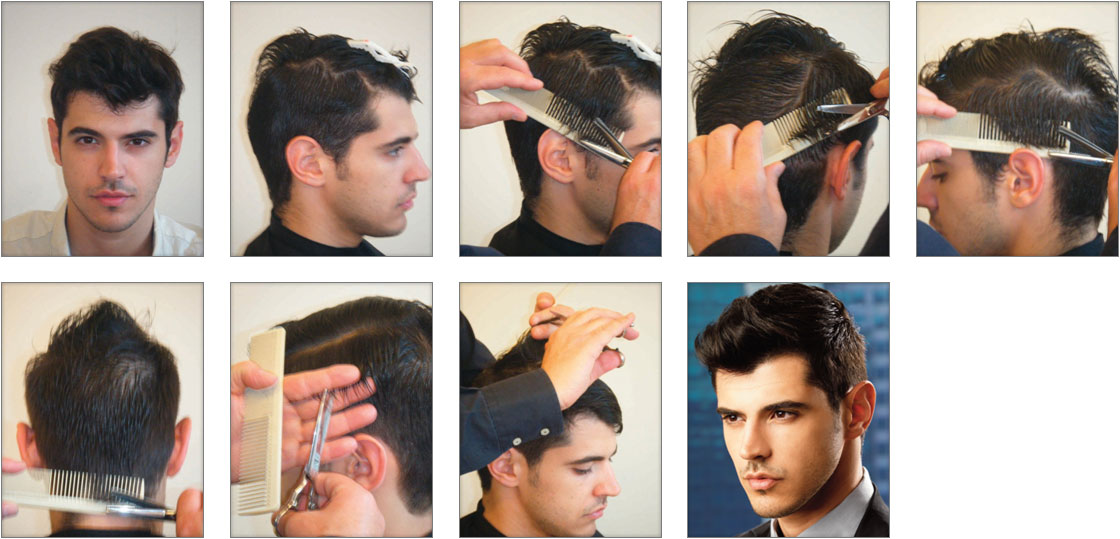
F R A N C E S C O

- Divide the inside zone from the external one.
- With the help of the machine adjusted on 9 mm., cut the excessive length in the external zone.
- Go over the same area with the machine more times, so that to be sure not to leave undesirably lengths.
- Keep the hair with the comb, clean properly the transition line of the graduation.
- With the help of the machine adjusted on 6 mm. and the shade technique, clean properly on both sides of the whiskers area, the ears, the side hairlines and the low nape.
- With comb and scissors refine carefully the whiskers area, around the ears and all the hairlines.
- Work in the internal zone. Draw a central section profile of about 1-1,5 cm., raise the section at 90°, take as reference the graduation previously made and cut the excessive length with a light front diagonal, that is from the short to the long in order to obtain greater length on the front hairlines.
- Go on with the profile sections, take them basis-on basis and cut the hair with the same technique for the whole internal area. The reference will be the previously made shade and the profile section cut before.
- Work in the crown zone and with some vertical sections, link the graduation you previously made to the internal zone and
- then clear away corners possibly created in the shape.
- Go on with the same technique starting from the right side and finishing to the left one.
- Through the crossing check and vertical sections, clear away possible excess in length. Use the same technique for the whole internal zone.
- Proceed with the styling.
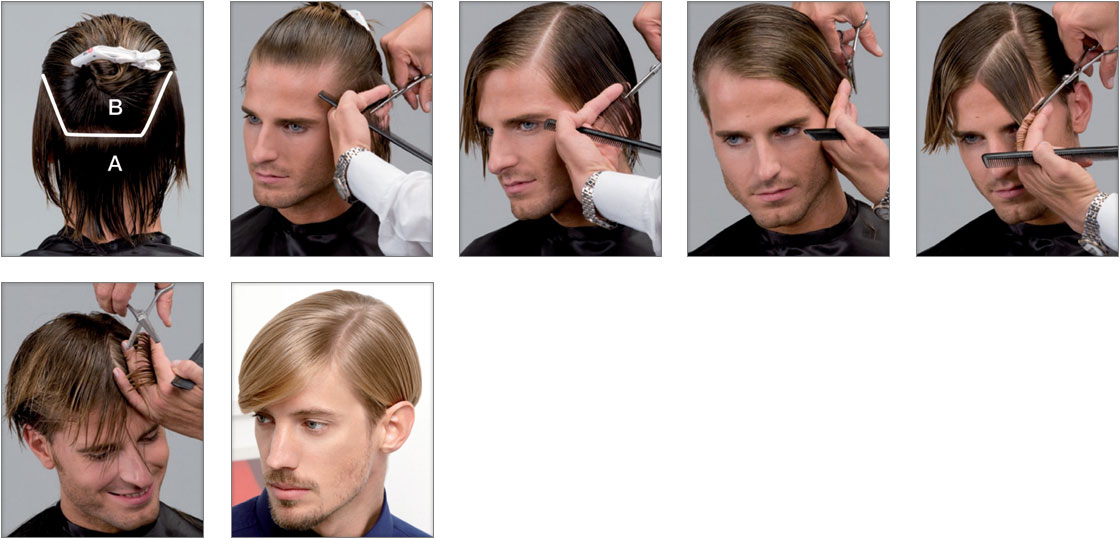
Z A R K O

- Before.
- Divide the top at zig-zag.
- Cut with smooth blade on comb.
- Go on the back side, leaving length in the central area of the linking zone.
- Repeat on the left side.
- Cut the graduation zone to extend in the intermediate link with a reference length of 3 cm.
- Cut both sides with deep scissors tip until the height of the
- eyebrow.
- Cut the top starting from the intermediate linking zone with scissors tip technique.
S E N S E O F N E W

- Starting from the temples, draw two horizontal lines finishing at about 2 cm.behind the ear. Go on drawing a line linking the previous ones close to the occipital bone, in this way the upper panel B and the lower one A, will be delimited.
- Panel A: comb from the low towards the high and cut vertically to the shoulders maintaining a length of about 2 cm. Go on with the same technique in the whole panel without creating any shade or graduation.
- Panel B: comb the hair of the whole panel from the right side and cut close the ear following the line of the previous division.
- Repeat the operation by combing the hair on the opposite side.
- Starting from the central front section draw some triangle sections beginning in the pivot, creating a light shade.
- In order to lighten the cut, bring towards the high some horizontal sections creating light disconnections with the
- scissors tips

- Create a rectangle of 2 cm thick, in the frontal part finishing at the temples height.
- Apply Supermeches+ no ammonia mixed with Oxid’o 20 volumes. Give tone with Color Wear 9.21.
- At last apply on the whole hair Color Wear 8.12.


